High Dynamic Range (HDR) technology significantly enhances the visual experience by providing brighter whites, darker blacks, and a broader spectrum of colors. However, maximizing the potential of RTX HDR requires precise tuning, which can be achieved using the Nvidia Profile Inspector. This guide delves into the Nvidia Profile Inspector tool, detailing how to Enhancing RTX HDR with Custom Tweaks using Nvidia Profile Inspector settings, common issues and fixes, and advanced tweaks for optimal performance.
Introduction to Nvidia Profile Inspector
Nvidia Profile Inspector is an advanced configuration tool that provides granular control over Nvidia GPU settings. Unlike the standard Nvidia Control Panel, Nvidia Profile Inspector allows users to delve deeper into the GPU’s capabilities, offering more detailed and specific options for performance tuning and visual enhancements.
Key Features:
- Profile Management: Create, edit, and manage profiles for different applications and games.
- Detailed Tweaks: Access to settings not available in the Nvidia Control Panel, such as specific texture filtering options, antialiasing settings, and frame rate limits.
- Performance Monitoring: Real-time performance monitoring to assess the impact of various tweaks.
- Compatibility: Works with all Nvidia GPUs and supports multiple driver versions.
Nvidia Profile Inspector is an invaluable tool for enthusiasts looking to push their hardware to the limits and optimize their gaming or professional workflows.
Enhancing RTX HDR with Custom Tweaks using Nvidia Profile Inspector
Detailed Steps on Tweaking Peak Brightness and Other HDR Settings
To optimize HDR settings using Nvidia Profile Inspector, follow these detailed steps:
- Download and Install Nvidia Profile Inspector:
- Obtain the latest version from a trusted source such as GitHub. or NVIDIA Profile Inspector download page.
- Extract and run the executable file.
- Launching the Tool:
- Open Nvidia Profile Inspector.
- Select the profile for the game or application you want to tweak from the dropdown menu.
- Adjusting HDR Settings:
- Navigate to the “3 – Antialiasing” and “5 – Common” sections.
- Locate the “HDR Enable” setting and set it to “On.”
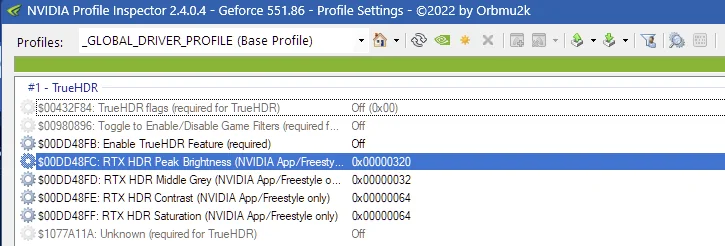
- Adjust “Peak Brightness” to match your monitor’s capabilities. For most HDR displays, a peak brightness setting between 1000 and 2000 nits is recommended.
- Modify the “Tone Mapping” settings to enhance the dynamic range. Adjust parameters like “Highlight Clipping” and “Shadow Detail” to fine-tune the HDR experience.
- Saving the Profile:
- After making adjustments, click “Apply Changes” to save the profile.
- Test the settings in-game or in the application to ensure they provide the desired visual enhancements.
- Fine-Tuning:
- Based on performance and visual feedback, return to Nvidia Profile Inspector to make further adjustments.
- Experiment with settings like “HDR Gamma” and “HDR Contrast” to achieve the perfect balance.
Practical Example: Optimizing HDR for Cyberpunk 2077
Cyberpunk 2077 is known for its visually stunning HDR implementation. Here’s how to optimize it using Nvidia Profile Inspector:
- Select the Cyberpunk 2077 profile from the dropdown menu.
- Enable HDR and set the Peak Brightness to 1500 nits.
- Adjust Tone Mapping settings to balance highlights and shadows.
- Save and test in-game, ensuring to tweak settings based on in-game performance and visual quality.
Common Issues and Fixes
Addressing Common Problems like Incorrect Peak Brightness
HDR optimization can sometimes lead to issues such as incorrect peak brightness or washed-out colors. Here are common problems and their fixes:
- Incorrect Peak Brightness:
- Issue: The display appears too bright or too dim.
- Fix: Ensure the Peak Brightness setting matches your monitor’s specifications. Adjust the setting incrementally and test in-game.
- Washed-Out Colors:
- Issue: Colors appear faded or lack vibrancy.
- Fix: Adjust the Tone Mapping settings, particularly the “HDR Gamma” and “HDR Contrast” options. Ensure your monitor’s HDR mode is enabled and properly configured.
- HDR Not Activating:
- Issue: HDR settings do not apply, and the display remains in SDR mode.
- Fix: Verify that HDR is enabled in both Windows settings and the game/application settings. Ensure the display and GPU support HDR.
- Performance Drops:
- Issue: Significant frame rate drops when HDR is enabled.
- Fix: Lower the Peak Brightness and adjust Tone Mapping settings to reduce the GPU load. Consider lowering other graphical settings to balance performance.
Troubleshooting Tips
- Monitor Firmware:
- Ensure your monitor’s firmware is up-to-date, as firmware updates can improve HDR performance and compatibility.
- Driver Updates:
- Always use the latest Nvidia drivers. Outdated drivers can cause compatibility issues and suboptimal HDR performance.
- Reverting to Default Settings:
- If extensive tweaking causes issues, revert to the default settings in Nvidia Profile Inspector and start the optimization process anew.
Advanced Tweaks
Exploring More Advanced Settings and Custom XML Files for Optimal HDR Performance
For users seeking to maximize their HDR experience, Nvidia Profile Inspector offers advanced settings and customization through XML files.
Custom XML Files
Custom XML files allow users to define specific settings not accessible through the Nvidia Profile Inspector GUI. These files can be downloaded from various forums and communities, such as Reddit’s Nvidia subreddit.
Steps to Use Custom XML Files:
- Download a Custom XML File:
- Search for custom XML configurations that suit your needs. Ensure the source is reliable.
- Load the XML File in Nvidia Profile Inspector:
- Open Nvidia Profile Inspector.
- Click on the “Import User Defined Profiles” button.
- Select the downloaded XML file and apply the settings.
- Editing XML Files:
- Open the XML file in a text editor.
- Modify specific settings such as “HDRMode” and “PeakBrightness” to match your preferences.
- Save the file and reload it in Nvidia Profile Inspector.
Advanced Settings in Nvidia Profile Inspector
- Antialiasing and Texture Filtering:
- Enhance visual quality by fine-tuning antialiasing settings. Options like “MSAA” and “Supersampling” can significantly improve image sharpness.
- Adjust texture filtering settings to balance quality and performance. Anisotropic filtering can enhance texture clarity at oblique angles.
- Frame Rate Limiting:
- Use frame rate limiting to ensure smooth performance. Setting a cap slightly below your monitor’s refresh rate can reduce screen tearing and input lag.
- Shader Caching:
- Enable shader caching to improve load times and reduce stuttering in games. This setting stores compiled shaders, reducing the need for recompilation during gameplay.
Case Study: Optimizing HDR for Red Dead Redemption 2
Red Dead Redemption 2 benefits greatly from HDR optimization. Here’s how to enhance its HDR performance:
- Profile Selection:
- Select the Red Dead Redemption 2 profile in Nvidia Profile Inspector.
- HDR Settings:
- Enable HDR and set Peak Brightness to 1200 nits.
- Adjust Tone Mapping settings to balance the expansive environments and detailed textures.
- Advanced Tweaks:
- Enable Supersampling for improved image quality.
- Set a frame rate limit of 60 FPS to ensure consistent performance.
Final Thoughts on Advanced Tweaks
Experimenting with advanced settings can significantly enhance the HDR experience. However, it’s essential to balance visual quality and performance, ensuring that the tweaks do not negatively impact the overall gaming experience.
Conclusion
Nvidia Profile Inspector is a powerful tool for optimizing RTX HDR settings, offering capabilities beyond the standard Nvidia Control Panel. By following the steps outlined in this guide, users can achieve superior HDR performance, addressing common issues and leveraging advanced tweaks for the best possible visual experience.
Remember, the key to successful HDR optimization is patience and experimentation. Each game and application may require unique settings, and what works best will depend on your specific hardware and preferences. Happy tweaking!
For more detailed discussions and community-driven tips, visit the Nvidia subreddit.